How to Build an LLM from Scratch with PyTorch: A TinyGPT Tutorial
- May 15
- 13 min read
Introduction: You Use LLMs Every Day — But Do You Know What's Inside?
You call openai.ChatCompletion.create(...) and a response appears. You paste code into Copilot and a completion materialises. It feels like magic, and for most developers it stays magic indefinitely — because none of the hosted APIs ever ask you to care about tokens, attention masks, or training loss.
That gap between using a language model and understanding one is quietly becoming a career bottleneck. Interviews for ML-adjacent roles increasingly probe whether you know why a decoder-only model uses causal masking, how tokenisation shapes what a model can learn, and what actually happens when you call .generate().
The Build LLM from Scratch course solves that gap by walking you through building a complete, working GPT-style language model yourself — dataset to deployment.
Real-world use cases this project enables:
Understanding how modern decoder-only language models work internally
Teaching transformer fundamentals in a university course or workshop
Building a tiny prompt-to-code generation model for demos and experiments
Experimenting with tokenisation, masked loss, and decoding strategies
Creating a local inference API around a trained PyTorch checkpoint
Preparing for advanced topics like fine-tuning, RAG, and production model deployment
This blog post covers the architecture, the full technology stack, the implementation phases, and the most painful technical challenges you'll hit. It does not include the full working source code — that lives in the course.
📄 Before you dive in — grab the free PRD template that maps out this entire system: architecture, API spec, sprint plan, and system prompt. [Download the free PRD]
How It Works: The Core Concept of LLM from Scratch
The Naive Approach — and Why It Fails
The simplest thing you could do with a text dataset is dump it into a flat file, split it into fixed-length character chunks, and train a recurrent network to predict the next character. This actually works well enough to generate convincing Shakespeare. The problem is it learns nothing useful about structure.
For a prompt-to-code model the failure is more specific:
No prompt/code boundary awareness. If your training string is "print hello world\nprint('hello world')", the model has no idea where the instruction ends and the code begins. It will happily try to predict characters inside the prompt at inference time, wasting capacity.
Loss computed on the wrong tokens. If you compute next-token loss over the whole sequence, the model spends most of its gradient budget learning to reconstruct prompts — text it will always be given — instead of learning code completions.
Flat character streams have no positional meaning. Without positional encodings or structured sequence design, a tiny model on a small dataset quickly degenerates into character-frequency noise.
No decoding controls. Temperature=1.0 on a character-level model over a small vocabulary produces gibberish at any reasonable length.
How the Transformer Decoder Fixes This
A decoder-only transformer (the GPT architecture) solves each of these problems:
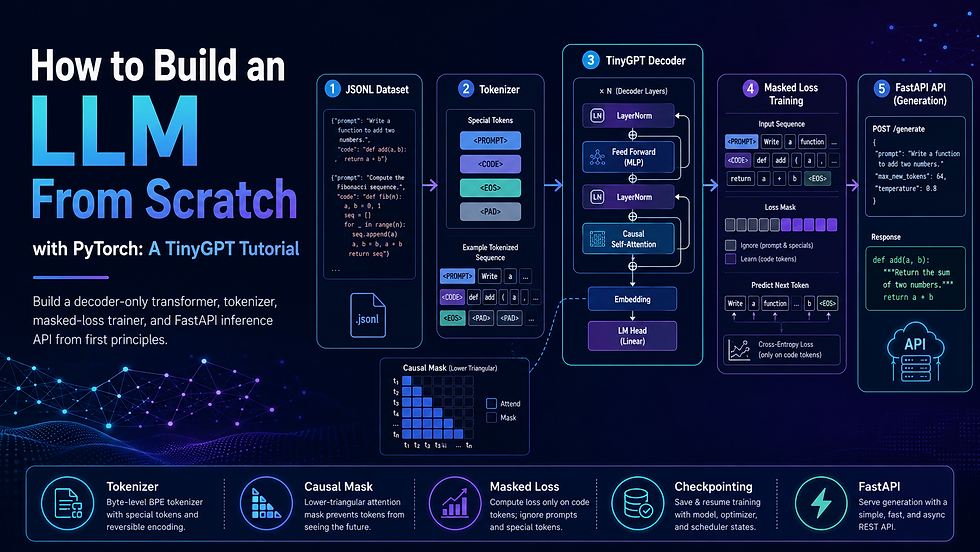
Special control tokens (<PROMPT>, <CODE>, <EOS>, <PAD>) make boundaries machine-readable. The model learns that tokens after <CODE> are what it must generate.
Masked loss with ignore_index zeroes out the gradients for all prompt tokens, so the model optimises only on code completion.
Causal self-attention lets every token attend to all previous tokens in the sequence, building rich contextual representations without peeking at future tokens.
Temperature, top-p, and repetition penalty give you principled controls over sampling behaviour at inference time.
Pipeline at a Glance
╔══════════════════════════════════════════════════════════════════╗
║                    TRAINING PIPELINE                             ║
╠═══════════════╦══════════════════╦═══════════════════════════════╣
║  JSONL File   ║   Tokenizer      ║   TinyGPT Trainer             ║
║  ──────────   ║   ─────────────  ║   ──────────────────────      ║
║  {prompt, →   ║  build_vocab() → ║  mask prompt labels      →    ║
║   code}       ║  encode(seq)     ║  CrossEntropyLoss(ignore) →   ║
║               ║  save vocab      ║  AdamW optimiser         →    ║
║               ║                  ║  checkpoint.pt                ║
╚═══════════════╩══════════════════╩═══════════════════════════════╝

╔══════════════════════════════════════════════════════════════════╗
║                    INFERENCE PIPELINE                            ║
╠══════════════════╦══════════════════╦════════════════════════════╣
║  FastAPI Request ║  Loaded Model    ║  Response                  ║
║  ──────────────  ║  ──────────────  ║  ──────────────────────    ║
║  POST /generate  ║  load checkpoint ║  decode token ids     →    ║
║  {"prompt": …} → ║  tokenize prompt ║  strip control tokens →    ║
║                  ║  .generate()   → ║  {"code": "…"}             ║
╚══════════════════╩══════════════════╩════════════════════════════╝
The analogy: Think of the training pipeline as teaching a student using a highlighted textbook. You cover the question with a sticky note so they only score marks on the answer portion (masked loss). At exam time, you hand them the question and let them write. The sticky note is ignore_index.
System Architecture Deep Dive
Architecture Overview
The project has seven clear layers, each with a specific responsibility:
Dataset Layer — A JSONL file where each line is a JSON object containing a "prompt" key and a "code" key. Validation ensures every record has both fields, no blank values, and that the combined sequence fits within the model's context window after tokenisation.
Tokenizer Layer — A character-level tokenizer that scans the full corpus, builds a character-to-index vocabulary, and adds special control tokens at fixed indices (<PAD>=0, <UNK>=1, <PROMPT>=2, <CODE>=3, <EOS>=4). The tokenizer can serialise and deserialise its vocabulary from a JSON file so the same mapping is used at training time and inference time.
Model Architecture Layer — A compact GPT-style transformer decoder. Each block contains: layer normalisation, a causal multi-head self-attention module (with the causal mask applied in forward()), residual connection, a second layer norm, and a two-layer feed-forward network with GELU activation. The final LM head is a linear projection from d_model to vocab_size.
Training Layer — Converts each JSONL row into a supervised sequence by inserting control tokens, pads or truncates to context_len, builds the label tensor by shifting input right by one, and replaces prompt-region label tokens with ignore_index=-100. Trains with CrossEntropyLoss and AdamW, logging train/validation loss every N steps and saving the best checkpoint.
Generation Layer — Loads the saved checkpoint, reconstructs the exact model architecture from stored hyperparameters, and runs autoregressive sampling with temperature, top-p nucleus sampling, and a repetition-penalty coefficient. A fallback heuristic retrieves the closest training example when the model output is suspiciously short or repetitive.
Testing Layer — A unittest-based smoke-test suite that validates the tokenizer round-trip, confirms a single training step reduces loss, verifies checkpoint save/load round-trip fidelity, and checks that the generation pipeline returns non-empty output for a known prompt.
API Deployment Layer — A FastAPI application that loads the model and tokenizer once at startup (not per request), exposes /health and /generate endpoints, and can be deployed to Render, Railway, or any PaaS that supports a Python process.
Component Table
Component | Role | Technology Options |
Dataset format | Training data storage | JSONL (used), CSV, SQLite |
Tokenizer | Text ↔ integer encoding | Character-level (used), BPE, SentencePiece |
Model architecture | Sequence-to-sequence prediction | TinyGPT/Transformer decoder (used), LSTM, Mamba |
Training framework | Gradient computation, optimisation | PyTorch 2.x (used), JAX, TensorFlow |
Loss function | Objective during training | CrossEntropyLoss + ignore_index (used), NLL |
Decoding | Token sampling at inference | Temperature + top-p + rep-penalty (used), greedy, beam |
Testing | Regression / smoke testing | unittest (used), pytest |
Inference API | HTTP serving | FastAPI + Uvicorn (used), Flask, gRPC |
Deployment | Cloud hosting | Render, Railway, Fly.io, AWS Lambda |
Checkpoint storage | Saving/loading trained model | .pt file with metadata dict (used), ONNX |
Data Flow Walkthrough
Training path: A single JSONL row {"prompt": "reverse a list", "code": "lst[::-1]"} is read and encoded as <PROMPT>reverse a list<CODE>lst[::-1]<EOS>. Control tokens are prepended/inserted by the tokenizer's encode_supervised() method. The input tensor x is the sequence with the final token removed; the label tensor y is the sequence with the first token removed (shift by one). Every label position that corresponds to a prompt token or padding is set to -100. A forward pass through the transformer computes logits; CrossEntropyLoss ignores -100 positions and computes gradients only over code tokens. After N steps the best checkpoint is saved.
Inference path: The user POSTs {"prompt": "reverse a list"} to /generate. FastAPI's endpoint passes the prompt through tokenizer.encode_prompt() (producing <PROMPT>reverse a list<CODE>), feeds the token tensor into model.generate(), which autoregressively samples one character at a time until it produces <EOS> or reaches max_new_tokens. The raw output is decoded, control tokens are stripped, and the response returns {"code": "lst[::-1]"}.
Two Non-Obvious Design Decisions
Decision 1: Causal mask is built once and registered as a buffer. Most tutorials recreate the upper-triangular mask every forward pass. Because this is a fixed matrix for a given context length, registering it as a torch.nn.Module buffer means it is created once, lives on the correct device automatically, and shows up in state_dict() — so it survives checkpoint round-trips without device-placement bugs.
Decision 2: Checkpoint includes hyperparameters, not just weights. Saving only model.state_dict() forces the loading code to know the exact architecture parameters (d_model, n_heads, n_layers, vocab_size) out-of-band. Saving a metadata dict alongside the state dict means load_checkpoint() can reconstruct the model completely from the file, preventing silent shape-mismatch errors weeks after training.
Tech Stack Recommendation
Stack A — Beginner / Prototype (Can Be Built in a Weekend)
Designed to run entirely on a laptop with 8 GB RAM and no GPU.
Layer | Technology | Why |
Language | Python 3.10+ | Ecosystem standard for ML |
Deep learning | PyTorch 2.x (CPU) | Readable APIs, strong debugging |
Dataset | Hand-crafted JSONL (50–200 rows) | Small enough to validate by eye |
Tokenizer | Custom character-level | No external deps, teaches fundamentals |
Model | TinyGPT (2 layers, 128 d_model) | Trains in minutes on CPU |
Testing | unittest (stdlib) | Zero install overhead |
API | FastAPI + Uvicorn | Minimal boilerplate, auto-docs |
Deployment | Render free tier | Free HTTPS, zero DevOps |
Estimated monthly cost: $0 (CPU training + Render free tier)
Stack B — Production-Ready (Designed to Scale)
Designed for a real fine-tuning project or a hosted demo with real traffic.
Layer | Technology | Why |
Language | Python 3.11+ | Faster interpreter, better typing |
Deep learning | PyTorch 2.x + CUDA | 10–100× training speedup on GPU |
Dataset | Curated JSONL (1 K–100 K rows) | Enough signal for useful completions |
Tokenizer | tiktoken or SentencePiece BPE | Sub-word tokens, larger vocab |
Model | GPT-2 small or fine-tuned Llama | Pre-trained weights, less training needed |
Experiment tracking | Weights & Biases | Loss curves, hyperparameter sweeps |
Testing | pytest + coverage | Parameterised tests, CI integration |
API | FastAPI + Uvicorn + Gunicorn | Multi-worker production serving |
Deployment | AWS EC2 g4dn.xlarge or Modal | GPU inference, autoscaling |
Monitoring | Prometheus + Grafana | Latency, error rate, throughput |
Estimated monthly cost: $80–200 (T4 GPU instance + managed DB + monitoring)
Implementation Phases
Phase 1: Dataset Validation and Tokenizer
The first phase is about getting the data and vocabulary right before writing a single model layer. You load your JSONL file, check that every row has both prompt and code keys, verify that no value is empty or overlong, and report statistics (median sequence length, unique characters, token budget per row).
Once the data is validated, you build the character-level vocabulary by iterating over every character in the corpus and adding special control tokens at fixed, reserved indices. The tokenizer must handle unknown characters without crashing, pad sequences to a fixed length, and save and reload the vocabulary from disk reliably.
Key technical decisions:
Where to place special tokens in the index space (before or after regular characters)
How to handle characters seen at inference time that were not in training vocabulary
Whether to strip whitespace from code snippets before tokenisation
Phase 2: Causal Self-Attention and the Transformer Block
Phase 2 is where most learners get stuck, because causal self-attention involves four interacting ideas: query/key/value projections, scaled dot-product attention, multi-head splitting, and the causal mask.
You implement a CausalSelfAttention module that projects the input into Q, K, V tensors, splits them across H heads, computes scaled dot-product attention with the upper-triangular mask applied before softmax (replacing masked positions with −∞ so they contribute zero attention weight), concatenates the head outputs, and projects back to d_model.
This module is wrapped in a TransformerBlock that adds layer normalisation and a residual connection around both the attention sub-layer and the feed-forward sub-layer. Stacking N of these blocks with an embedding layer and an LM head gives you a complete TinyGPT model.
Key technical decisions:
Pre-LayerNorm vs Post-LayerNorm (pre-norm is more stable for tiny models)
Causal mask stored as buffer vs recomputed each forward pass
Whether to tie input embedding weights with the LM head output projection
Phase 3: Supervised Training with Masked Loss
Phase 3 converts the tokenizer output into training batches and implements the masked-loss training loop. The key insight is building the label tensor correctly: you shift the input sequence left by one position, then set every label position that corresponds to a prompt token or padding to ignore_index=-100.
You implement a DataLoader-compatible dataset class, a training loop that computes train loss and validation loss on separate splits, gradient clipping to prevent exploding gradients in early training, and a checkpoint-saving routine that writes both the model state dict and the architecture hyperparameters to a single .pt file.
Key technical decisions:
How to identify which label positions belong to the prompt region (track the code-start index during encode_supervised())
Batch size vs gradient accumulation given memory constraints
How often to evaluate on the validation split without spending too much time in eval mode
Phase 4: Text Generation with Decoding Controls
With a trained checkpoint available, Phase 4 implements the generation pipeline. You write a generate() function that encodes the prompt with control tokens, runs the model autoregressively until it produces <EOS> or reaches a maximum length, and applies temperature scaling, top-p nucleus sampling, and a repetition penalty at each step.
This phase also introduces the fallback heuristic: when the generated output is below a minimum length threshold or contains a high repetition ratio, the system retrieves the closest matching example from the training set (by character-level edit distance or Jaccard similarity on prompt tokens) and returns that code instead.
Key technical decisions:
Temperature value (0.7–0.9 is usually a good starting point for code)
top-p cutoff (0.9–0.95 retains enough diversity without chaos)
Repetition penalty strength (1.2–1.4 reduces loops without killing variety)
Phase 5: Smoke Tests and FastAPI Deployment
The final phase wraps the whole system in tests and an HTTP API. The smoke-test suite runs four checks: the tokenizer correctly encodes and decodes a known string; a single training step on a dummy batch reduces loss compared to a random baseline; the checkpoint save/load cycle produces identical logits; and the generation pipeline returns non-empty output for a held-out prompt.
The FastAPI app loads the model and tokenizer at startup using Python's lifespan context manager, stores them in application state, and exposes two routes: GET /health returns model metadata and status, and POST /generate accepts a JSON body with a prompt field and returns generated code.
Key technical decisions:
Using lifespan (not @app.on_event) for startup/shutdown in modern FastAPI
Returning a 503 if the model is not yet loaded rather than a silent 500
Whether to add a request timeout and queue depth limit for the hosted version
Common Challenges
Building a character-level GPT from scratch surfaces problems that are invisible when you use a hosted API. Here are the seven most painful, with their root causes and fixes.
1. Model generates repetitive loops ("print print print …")
Root cause: Without a repetition penalty, the model's greedy distribution quickly locks onto the highest-probability token — which is often the last token it just generated. Fix: Apply a repetition penalty of 1.2–1.4 by dividing the logit of any token already in the recent output window before softmax. Combine with top-p ≥ 0.9 so the distribution stays non-deterministic.
2. Training loss drops but validation loss spikes (overfitting)
Root cause: A small character-level model with hundreds of parameters can memorise a JSONL dataset of fewer than 100 examples in a few hundred steps. Fix: Add dropout (0.1–0.2) to attention weights and the feed-forward block. Use a validation split of at least 10% and stop training when validation loss stops improving for N consecutive evaluations.
3. Checkpoint load fails with RuntimeError: size mismatch
Root cause: The model was saved with one set of hyperparameters (e.g. vocab_size=95) but is being loaded with a different tokenizer that has vocab_size=97. Fix: Save hyperparameters inside the checkpoint dict alongside state_dict. Load architecture from the stored hyperparameters, not from a separately maintained config file.
4. Causal mask produces NaN in attention weights
Root cause: Replacing upper-triangle positions with a very large negative float (e.g. -1e9) can produce nan after softmax when d_k is small and all valid attention weights are also very small. Fix: Use float('-inf') (or torch.finfo(dtype).min for half precision) so softmax maps those positions to exactly zero rather than a tiny positive number.
5. Tokenizer produces <UNK> for common characters at inference time
Root cause: The vocabulary was built from a small training set that did not contain backticks, curly braces, or certain punctuation marks present in the user's prompt. Fix: Seed the vocabulary with the full printable ASCII set (characters 32–126) before scanning the corpus. This guarantees coverage for all common code characters without inflating vocab size.
6. FastAPI returns 500 on the first request after a long idle period
Root cause: Render's free tier spins down idle instances. The first request hits the server before the lifespan startup completes, so app.state.model is not yet set. Fix: Add a readiness check in the /health endpoint that returns {"status": "loading"} with a 503 status code if the model is not yet in app.state. Implement exponential-backoff retry in your client.
7. Generated code is syntactically invalid Python
Root cause: A character-level model trained on 100 examples cannot reliably learn Python indentation and parenthesis matching simultaneously. Small context lengths cut off the closing parenthesis. Fix: Increase context_len to at least 256 characters. Add a lightweight post-processing step that counts open brackets and either pads closing characters or truncates to the last syntactically complete statement. The course includes a post_process_code() utility for this.
Ready to Build This Yourself?
Reading about architecture is not the same as shipping a working model. There is a large gap between understanding the diagram and having a trained checkpoint that responds to real prompts through an API endpoint. The Build LLM from Scratch course bridges that gap with structured lessons, tested code, and a guided path from raw JSONL to deployed FastAPI service.
The full course includes:
✅ Complete, tested Python source code for every module
✅ 15 structured lessons with inline explanations
✅ Curated JSONL dataset of prompt/code examples
✅ Character-level tokenizer with special control token support
✅ Full TinyGPT transformer decoder implementation in PyTorch
✅ Supervised training loop with masked loss and checkpoint saving
✅ Text generation with temperature, top-p, and repetition penalty
✅ End-to-end smoke test suite (tokenizer, training, checkpoint, generation)
✅ FastAPI inference API with /health and /generate endpoints
✅ Step-by-step local deployment guide and cloud deployment walkthrough (Render)
✅ Lifetime access to all future updates
✅ Community support via Codersarts Discord
$29.99. Everything above.
Want a live walkthrough? Book a 1:1 guided session at $99.99 and the Codersarts team will set up the project with you, help you debug your training run, and explain every part of the transformer pipeline in real time. Book your session → labs.codersarts.com
Conclusion
Building a language model from scratch — even a tiny one — makes the entire LLM landscape legible in a way that reading papers or calling APIs never does. You come away understanding why causal masking is non-negotiable, how masked loss focuses training on the right tokens, why checkpoint metadata matters as much as model weights, and how a FastAPI layer turns a PyTorch .pt file into a production-ready service.
The recommended starting point is this order: validate your JSONL dataset first (garbage in, garbage out), then build and test the tokenizer in isolation, then implement causal self-attention one matrix operation at a time. Every later problem becomes easier once those three pieces are solid.
Ready to stop treating LLMs as black boxes? Start with the full course at labs.codersarts.com and build your own TinyGPT this weekend.


Comments