Deploying Machine Learning Models in SageMaker - AWS Cloud.
- Jan 27, 2021
- 9 min read
Updated: Feb 8, 2021
To get started with the deployment process of a Machine Learning Model over Amazon's SageMaker, first one needs to get familiar with the basic terminologies involved in the subject matter. Some of these are mentioned below:
Amazon Web services are a set of over simplified, serialisable, scalable on-demand, cloud services offered by Amazon through its subsidiary Amazon Web services Inc. Some of these services include Sagemaker, EC2, S3, RDS, Augmented AI, Container services etc. To stay in context with the agenda in hand we will go through only few relevant ones :
Amazon EC2 (Amazon Elastic Compute Cloud)
These are onn demand virtual servers, Allows you to launch your own virtual server in cloud with the operating system of your choice with just couple of mouse clicks.
S3 (Simplified Storage System)
Is an object storage service which allows you to upload your files, documents movies, music, videos etc at very low cost. (Ex. Dropbox actually uses s3 to store all of the user uploaded files). S3 even offers static website hosting, i.e if you have a school/college website developed in plain html (no server side coding) you can just deploy it in S3.
RDS(Relational Database Service)
This service allows people to host their database schema and data without worrying to manage underlying database server. All other things like patching, updating servers and maintaining will be taken care by Amazon itself. You just have to create your schema and connect to it from your application and then start using it.
AWS Sagemaker
SageMaker has been a great deal for most data scientists who would want to accomplish a truly end-to-end ML solution. This is because of the fact that it takes care of abstracting a ton of software development skills necessary to accomplish the task while still being highly effective and flexible. These abstraction otherwise are too hefty to be built locally. Some of these abstractions include:
Estimators -Encapsulate training on SageMaker.
Models -Encapsulate built ML models.
Predictors -Provide real-time inference and transformation using Python data-types against a SageMaker endpoint.
Session -Provides a collection of methods for working with SageMaker resources.
Transformers -Encapsulate batch transform jobs for inference on SageMaker
Processors -Encapsulate running processing jobs for data processing on SageMaker.
Docker is an open platform for developing, shipping, and running applications. . A Docker image is a recipe for running a containerised process. In order to deploy a model in Amazons sagemaker, we need to load the image of that particular algorithm into our notebook and then create an endpoint which in turn can be served as an API to an application.
Container is a standard unit of software that stores up code and all its dependencies so the application runs fast and reliably from one computing environment to different ones. These are available for both Linux and Windows-based applications, containerised software will always run the same, regardless of the infrastructure. Containers isolate software from its environment and ensure that it works uniformly despite differences.
Docker Image is a read-only template that contains a set of instructions for creating a container that can run on the Docker platform. It provides a convenient way to package up applications and pre-configured server environments, which you can use for your own private use or share publicly with other Docker users
Machine learning is a very broad topic, mostly considered as the back bone of Artificial Intelligence. So in simpler terms it can be defined as a set of algorithms used in internet search engines, email filters to sort out spam, websites to make personalised recommendations, banking software to detect unusual transactions, and lots of apps on our phones such as voice recognition.
Setups involved in Deployment process:
Environment Setup
Dependencies
Creation of an Amazon S3 Bucket
Creation of an Amazon SageMaker Notebook Instance
Transform the Training Data
Train a Model
Deploy the Model to Amazon SageMaker
Validate the Model
Clean Up
Environment Setup:
In this blog, I would like to keep the main focus on the the deployment workflow as a real world scenario, although the documentation is just as important, so keeping that i mind, before we can use Amazon SageMaker we must sign up for an AWS account, create an IAM admin user, and get onboard to Amazon SageMaker notebook instances.
After you complete these tasks, try out the Get Started guides. The guides walk you through training your first model using SageMaker notebook or the SageMaker console and the SageMaker API. To get to Get Started guides click here.
Once your are done with the account setup part, you will see the dashboard, and all of the AWS services are listed in different categories whether it be Database related or ML. A snippet of this is shown below:
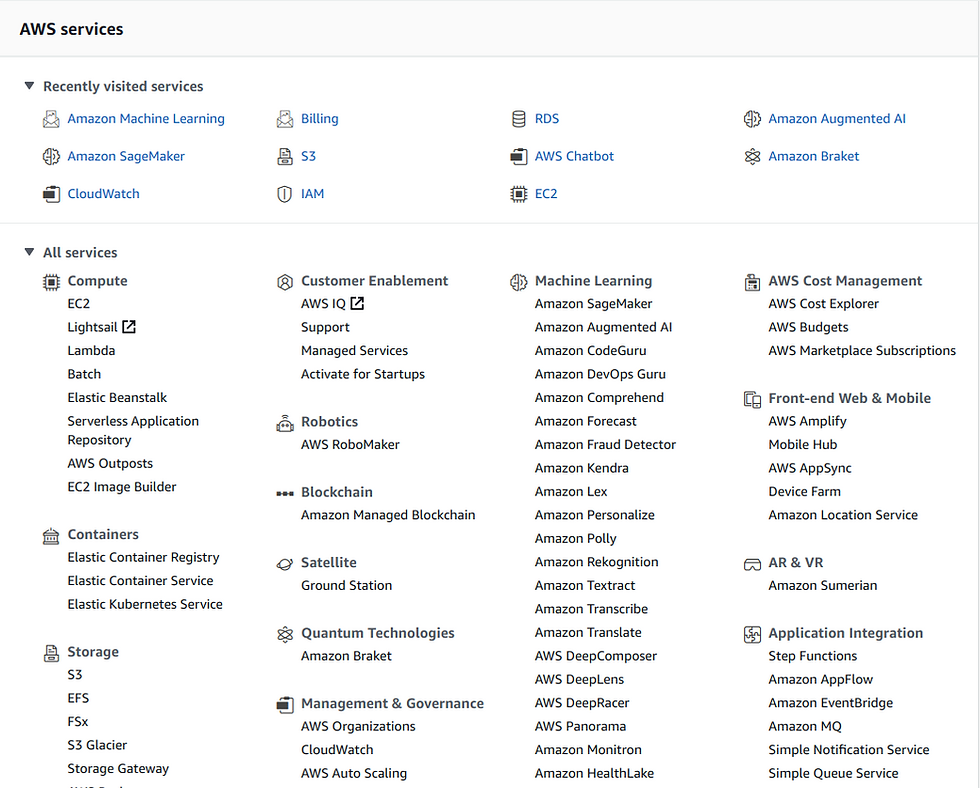
Now we are inside the main framework of AWS, to get to our SageMaker simply click on SageMaker, and then we create a notebook instance. Which looks like the snippet below:

In this snippet we can see the specifications of the instance I have already created, the instance type signifies the computational capacity , and other feature are quiet straight forward as signified by there names.
Dependencies
Now that all this is setup, we can get to the packages we need for a smoother workflow of our Python SDK all through importing data to deployment process. Some of these dependencies include:
import sagemaker
import boto3
from sagemaker.amazon.amazon_estimator import get_image_uri
from sagemaker.session import s3_input, Session
One of most important package here is the boto3, it is the name of the Python SDK for AWS. It allows you to directly create, update, and delete AWS resources from our Python scripts. We use this package to set up the s3 bucket to make the pipleline till model deployment easier.
Two important variables that need to be setup are the region and the name of bucket. The snippet below shows how we create bucket into s3 and set the output folder to save our model and other resources into.
s3 = boto3.resource('s3')
try:
    if  my_region == 'us-east-\1':
        s3.create_bucket(Bucket=bucket_name)
except Exception as e:
    print('S3 error: ',e)

prefix = 'xgboost-as-a-built-in-algo'
output_path ='s3://{}/{}/output'.format(bucket_name, prefix)
I have kept the prefix as xgboost as we are going to deploy a pre-built algorithm in the cloud.
boto3 is the Amazon Web Services (AWS) SDK for Python. It enables Python developers to create, configure, and manage AWS services, such as EC2 and S3. Boto provides an easy to use, object-oriented API, as well as low-level access to AWS services.
Creation of an Amazon S3 Bucket
Now it is time to load data into an s3 bucket. Amazon Simple Storage Service is storage for the Internet. It is designed to make web-scale computing easier for developers. Amazon S3 has a simple web services interface that you can use to store and retrieve any amount of data, at any time, from anywhere on the web. Keeping this in mind we load data from a url , into a pandas dataframe and then from there using boto3 we can load it in to a s3 bucket.
try:
urllib.request.urlretrieve ("https://data.csv")
print('Success')
except Exception as e:
print('Data load error: ',e)
try:
model_data =pd.read_csv('./data.csv',index_col=0)
print('Success: Data loaded into dataframe.')
except Exception as e:
print('Data load error: ',e)
boto3.Session().resource('s3').Bucket(bucket_name).Object(os.path.join(prefix,train/train.csv')).upload_file('train.csv')
s3_input_train = sagemaker.s3_input(s3_data='s3://{}/{}/train'. format(bucket_name, prefix), content_type='csv')
boto3.Session().resource('s3').Bucket(bucket_name).Object(os.path.join(prefix,'test/test.csv')).upload_file('test.csv')
s3_input_test = sagemaker.s3_input(s3_data='s3://{}/{}/test' .format(bucket_name, prefix),content_type='csv')
boto3.Session().resource('s3').Bucket(bucket_name).Object(os.path.join(prefix,'test/test.csv')).upload_file('test.csv')
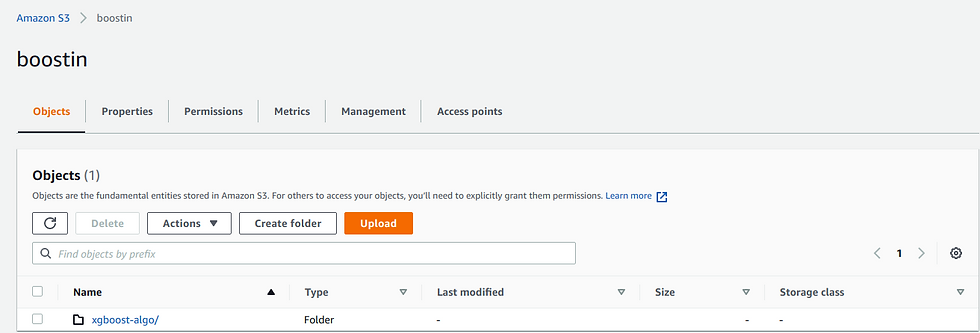
s3_input_test = sagemaker.s3_input(s3_data='s3://{}/{}/test'. format(bucket_name, prefix), content_type='csv')In this snippet we can see how one can download the data from a given url pre-process it and then save it into an s3 bucket. We can also manually open s3 and load data into it. The bucket looks something like the image below:
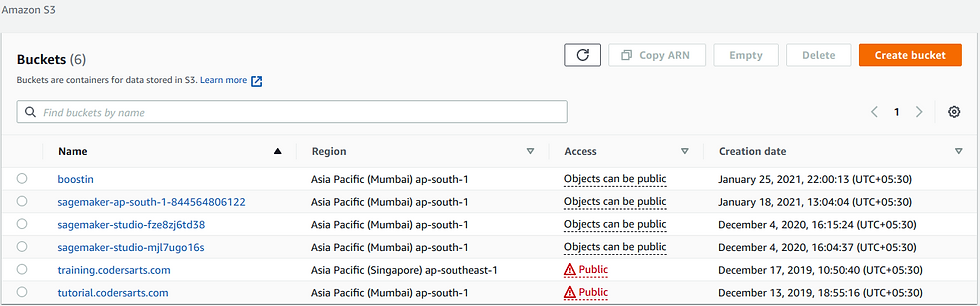
These are all of the buckets, in our s3 database but for the sake of this blog , we will limit the usage to boosting, as you can see there are different named buckets with the region, accesype and data. Using the code above we have loaded the data into boostin bucket as we are trying to implement an xgboost in sagemaker.
All the output will be stored in this bucket only, such as our model endpoints etc. and we can access this data from anywhere , since s3 have multiple data centres globally. There fore causing no pressure on local machine.
Creation of an Amazon SageMaker Notebook Instance
An Amazon SageMaker notebook instance provides a Jupyter notebook app through a fully managed machine learning (ML) Amazon EC2 instance. Amazon SageMaker Jupyter notebooks are used to perform advanced data exploration, create training jobs, deploy models to Amazon SageMaker hosting, and test or validation of different models. A preview of these instances in given below:

For a basic data set which is say 5 gb in size,if we try to load this dataset into memory on the notebook instance for exploration/pre-processing, the primary bottleneck here would be ensuring the instance has enough memory for your dataset. This would require at least the 16gb memory, for complexities like this aws has provided a large variety of highly scalable processors, memory units etc , situated at multiple nodes across the world. A complete list of ML instance types is available here. Some of these are listed below:
ml.t3.medium
ml.t3.large
ml.t3.xlarge
ml.t3.2xlarge
ml.m5.large
ml.m5.xlarge
ml.m5.2xlarge
ml.m5.4xlarge
ml.m5.8xlarge
ml.m5.12xlarge
ml.m5.16xlarge
ml.m5.24xlarge
Using the Amazon SageMaker SDK, the training data is loaded and distributed to the training cluster, allowing the training job to be completely separate from the instance which hosted notebook is running on. Figuring out the ideal instance type for training will depend on whether our algorithm of choice/training job is memory, CPU, or IO bound.
Transform the Training Data
Data transformation is a technique used to convert the raw data into a suitable format as needed by the model and put it in to the output path to our s3 which we defined earlier. This could involve a large range of strategies from feature engineering to vectorization, some of these are listed below:
Data Smoothing.
Data Aggregation.
Discretization.
Generalisation.
Attribute construction.
Normalization.
Next stage to this pipline is splitting the data into Training and test sets. And we save it back to our bucket in order to be used by our Estimator.
import numpy as np
from sagemaker.predictor import csv_serializer                import os

#train_test_split
train_data, test_data = np.split(model_data.sample(frac=1,
                             random_state=1729),
                             [int(0.7 * len(model_data))])
#Raw Data Into a Suitable Format
pd.concat([train_data['Target_1'], train_data.drop(['Target_',
                                   'y_yes'],axis=1)] ,axis=1).
                                   to_csv('train.csv',
                                   index=False, header=False)
#Train Data Transfer To s3 Bucket
boto3.Session().resource('s3').Bucket(bucket_name).
                                Object(os.path.                                                                             .                               join(prefix, 'train/train.csv')).
                                upload_file('train.csv')

s3_input_train = sagemaker.s3_input(s3_data='s3://{}/{}/train'.
                                format(bucket_name, prefix),
                                content_type='csv')
Train a Model
Now that our data is ready in our database in order to train our model is choose a model set its hyper-parameters and start the training process. AWS comes with a list of inbuilt algorithm already built into docker images. So all we have to do is pull that image from the docker cloud, load it into a container and the model is ready to be trained. Alternatively we can also design our own model and then train it as well. In this blog we will stick to the agenda and deploy a builtin xgboost model on our data set.
# this line automatically looks for the XGBoost image URI and builds an XGBoost container.
container = get_image_uri(boto3.Session().region_name,
                      'xgboost',
                      repo_version='1.0-1')
In a general manner of speaking XGboost is a widely used algorithm in machine learning, whether the problem is a classification or a regression problem. It is known for its good performance as compared to many other machine learning algorithms. Now that our model is ready its hyper-meters needs to be set in order to achieve the optimal performance from the model. Below is a dictionary containing hyper-parameters for the model to be trained on.
# initialize hyperparameters
hyperparameters = {"max_depth":"5","eta":"0.2","gamma":"4",                     'min_child_weight":"6","subsample":"0.7", "objective":"binary:logistic","num_round":50}
SageMaker has a built in class which allows us to pass the model container, hyper-parameters , and other parameters in order to initialise a model object. Once this is done then we directly fit the Estimator to our data which resides in s3 bucket.
estimator.fit({'train': s3_input_train,'validation': s3_input_test})
Ones we execute this command the model starts the training and we can see the error rate decreasing each epoch.

After the training is complete the sagemaker uploads the model into the output path which we had defined earlier. It also outputs other details like training time, billable time etc.

Deploy the Model to Amazon SageMaker
The final step in the whole process is deploying the finalized model and creating an endpoint that will be accessed by external interfaces. The machine allocated in the endpoint will be in a running state and the cost will be deduced accordingly. So, when other external applications are not using it, then the endpoint should be removed using the delete option.
The code below shows how to deploy your model as an endpoint.
Estimator.deploy(initial_instance_count=1,instance_type='ml.m4.xlarge')Now that our model is out there as an API and could be used by different interfaces with appropriate privilege access to it.
Validate the Mode
The reason for doing cross validation is to avoid over-fitting to data. For example, you, while using the training data, you may manage to learn everything so perfectly, that you may have zero training error, but the classifier may not be generalized to give you a good performance on unseen data. Cross-validation helps us evaluate this performance on unseen data. In the next section we will test our model over the test set I had created earlier. This test set does not contain any label so the model does not know the labels and are totally foreign to the model.
predictions = xgb_predictor.predict(test_data_array).decode('utf-8')There are many techniques to check how good a model has performed, one of the most prominent such technique is use of confusion matrix. The snippet below shows an classification report of our analysis.

Clean Up
Clean up is done in order to remove any extra charges an organisation may incur from. For this purpose we remove all the endpoints we have created as well as the buckets and other sources. A simple way to do this is shown below:
sagemaker.Session().delete_endpoint(xgb_predictor.endpoint)
bucket_to_delete = boto3.resource('s3').Bucket(bucket_name)
bucket_to_delete.objects.all().delete()
Related links:
Build and Deploy your Machine Learning Application with Dockers. Get Started Now!
Codersarts offers programming assignment help, programming expert help, database assignment help, web programming help, Android app development. We are a group of top coders and developers, providing the best service with expertise in the specific domain of technology. instant help support.


Comments