Build a Chatbot with LangGraph | Beginner's Guide | Part 1
- Jun 11, 2025
- 5 min read
Updated: Jun 12, 2025

So you’ve heard about LangGraph and you're curious: “Can I really build a smart chatbot using this?” Yes, yes you can — and it’s easier than it sounds.
In this blog, we’ll walk you through a real code example from the official LangGraph documentation, but with a friendly twist: think of this as your coding buddy sitting down to explain every step over a warm cup of coffee.
By the end of this blog, you’ll not only know what each part of the code does but why it matters — with tips, examples.
What is LangGraph, Anyway?
Imagine you’re building a chatbot or a smart assistant. At every turn, it should remember what the user said before — like how a friend remembers your name, your last conversation, or your favorite pizza topping 🍕. Most LLMs (Large Language Models) are stateless — they forget everything unless you keep feeding the full history. That’s where LangGraph steps in.

LangGraph is a Python framework that helps you build stateful LLM workflows using a graph-based structure. It’s like drawing a flowchart, where each box (called a node) is a step in your logic, and each arrow (edge) connects the flow of data or decisions between steps. It’s built on top of LangChain but gives you more flexibility and clarity around the flow of control and state.
Why It’s Super Useful
Memory That Sticks: LangGraph carries state between steps. This is huge when you need your app to remember what’s already been discussed.
Visualizable Logic: Your app's logic becomes a graph — easy to reason about, debug, and extend.
Composable Workflows: You can plug in any number of nodes — not just LLM calls, but tools, APIs, decision-making steps, and more.
Branching and Conditional Flow: Want your chatbot to behave differently based on user input? LangGraph supports that — and even loops and concurrent steps.
Multi-agent Ready: It’s perfect when you have more than one AI “expert” collaborating in a system.
When Should You Use LangGraph?
When your app needs memory (like chatbots, assistants, RAG, or agent systems).
When you want to model complex flows — if/else, looping, retries, etc.
When you’re working on multi-agent setups where different agents talk to each other.
When you want clarity and control over how your LLM application works under the hood.
If you’ve ever felt like LangChain was a bit too "black-boxy" for complex logic, LangGraph gives you that sweet architectural transparency. It’s like switching from a prebuilt blender to a modular kitchen — build exactly what you want, the way you want.
Setup and Dependencies
Before we start, let’s prep our environment.
We’ll need:
Python 3.9+
An OpenAI API Key (from https://platform.openai.com/)
The following Python libraries:
pip install -U langgraph langsmith
pip install -U "langchain[openai]"
💡 Pro Tip: If you’re using Jupyter notebooks, install IPython and graphviz to visualize graphs.
Code Walkthrough — Let’s Decode It Together
Alright, we’ve got your environment ready, libraries installed, and curiosity piqued — now it’s time to actually build this thing!
In this section, we’re going to walk step-by-step through the code that wires up a simple chatbot using LangGraph. But instead of just dumping code on you, we’ll take it slow — explaining what each piece does and how it contributes to the bigger picture.
This isn’t just copy-paste code. It’s your guided tour into how LangGraph helps build chatty, intelligent workflows with memory. Let’s go!
By the end of this walkthrough, you’ll see how it all fits together — from defining a message-holding state to chatting with your AI assistant live. And don’t worry, you’ll learn what every magical-sounding function actually does.
Let’s kick things off by defining the data our chatbot needs to remember — the State.
Step 1: Defining Our State
from typing import Annotated
from typing_extensions import TypedDict
from langgraph.graph.message import add_messages

class State(TypedDict):
    messages: Annotated[list, add_messages]
Here, we’re defining a State — think of this like a notebook that your chatbot carries around that holds all messages exchanged so far.
Every time you or the bot says something, it is scribbled down in the notebook so that the chatbot can remember the context — kind of like keeping a chat history in its back pocket.
In code terms, it’s just a Python dictionary that holds the important info your graph nodes need to work with — like a mailbox where messages (and later, maybe other things like user preferences or flags) get dropped in and passed from one step to the next.
TypedDict says: this is a dictionary, but with a fixed format.
messages: a list to hold conversation messages.
Annotated with add_messages: appends new messages instead of overwriting them. So whenever a new message is generated, it is added to the existing list — without overwriting the previous messages. Without this, LangGraph would treat every message update as a replacement, wiping out the earlier messages.
🧠 Trivia: LangGraph uses these annotations to know how to update the state between steps.
Step 2: Setting Up the Graph
from langgraph.graph import StateGraph, START

graph_builder = StateGraph(State)
We’re telling LangGraph, “Hey, we’re going to build a graph, and it’s going to carry around this State we just defined.”
START is the entry point (like the lobby of a building).
StateGraph(State) sets up our graph to pass and update state.
Step 3: Get the Brain — The LLM
import os
from langchain.chat_models import init_chat_model

os.environ["OPENAI_API_KEY"] = "sk-..."
llm = init_chat_model("openai:gpt-4.1")
Here we load our language model. In this case, GPT-4.1 from OpenAI.
We set the API key as an environment variable.
init_chat_model() gives us a ready-to-use chat model.
⚠️ Gotcha: Make sure your OpenAI key has access to the model you specify!
Step 4: Define a Chatbot Node
def chatbot(state: State):
    return {"messages": [llm.invoke(state["messages\])]}
Output:

This function is our node — a self-contained action in the graph.
It takes the current state, feeds the messages to the model.
The model returns a response.
That response is wrapped in a dictionary and appended to messages (thanks to add_messages).
🍳 Analogy: Think of this function as a recipe: input = user messages, output = one delicious assistant response.
Step 5: Build the Graph
graph_builder.add_node("chatbot", chatbot)
graph_builder.add_edge(START, "chatbot")
graph = graph_builder.compile()
This is where the magic happens:
add_node: adds our chatbot function.
add_edge: connects the START to our chatbot.
compile(): finalizes the graph.
🔗 This is like wiring up your kitchen so the blender turns on when you flip the switch.
Step 6: (Optional) Visualise the Graph
from IPython.display import Image, display

display(Image(graph.get_graph().draw_mermaid_png()))
Output:
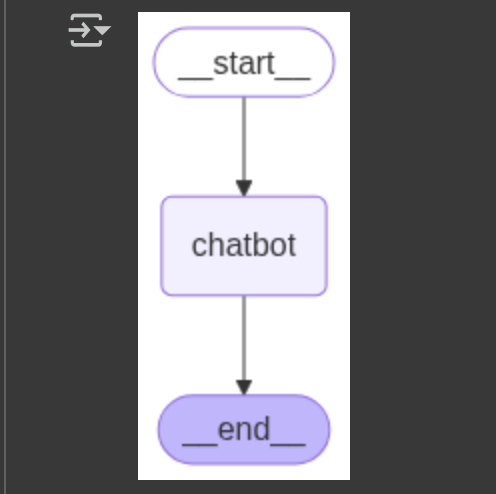
This draws your graph using Mermaid — if you have the right libraries.
🧼 If it fails, don’t worry! It’s optional and won’t affect your chatbot.
Step 7: Chat with the Bot
def stream_graph_updates(user_input: str):
    for event in graph.stream({"messages": [{"role": "user", "content": user_input}]}):
        for value in event.values():
            print("Assistant:", value["messages"][-1].content)
We start a conversation by feeding a user message. Then we:
Stream the graph execution.
Print the assistant’s last message from the updated state.
🔁 Step 8: Start the Loop
while True:
    try:
        user_input = input("User: ")
        if user_input.lower() in ["quit", "exit", "q"]:
            print("Goodbye!")
            break
        stream_graph_updates(user_input)
    except:
        user_input = "What do you know about LangGraph?"
        print("User: " + user_input)
        stream_graph_updates(user_input)
        break
This is your chatbot’s heart — an infinite loop until you type quit.
⚠️ Heads up: The except block is fallback logic if input() doesn’t work, like in some cloud notebooks.
What Should You See?
Example interaction:

Every response is appended to the state, so context is preserved across turns.
Troubleshooting Tips
Double-check your OpenAI API key.
Don’t forget to install all the dependencies.
If llm.invoke() fails, try a simpler model name like gpt-3.5-turbo.
Visualization won't work without Graphviz and Mermaid dependencies.
You just built a stateful chatbot using LangGraph! 🙌
You now understand:
What stateful workflows are
How LangGraph structures your app as a graph
How to run and expand it
This is just the beginning — you can now add branching, memory, or multiple nodes. We will cover all these in the upcoming blogs. So watch out for them.
If you need help building your own AI chatbot, multi-agent system, or enterprise automation, reach out to us at Codersarts — we offer expert help with AI, LangChain, LangGraph, and more.


Comments